English |
Português |
English |
Português |
|
||||||||
|
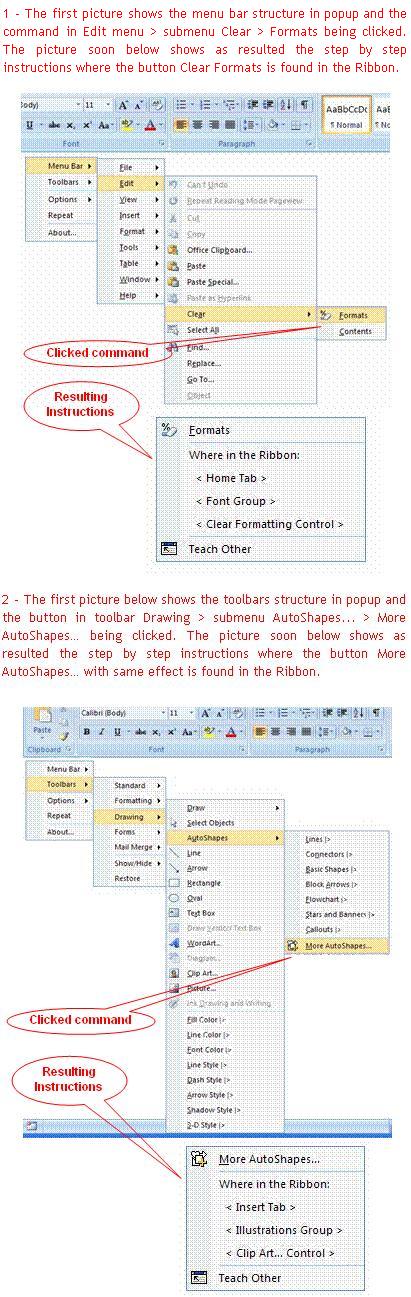
This utility is a COM add-in programmed in Microsoft® Visual Basic® for Application (VBA) using RibbonX and CommandBars objects to be functional in any Microsoft® Office local language. It destines to Microsoft® Word users migrating to the 2007, 2010, or 2013 version that, knowing the positions in the previous menu and toolbars structure, want to know instantaneously where they are in the Ribbon or want, eventually or not, to continue using menu and toolbars structure in the proper Word 2007, 2010, or 2013 without making changes in the Ribbon that could disturb the adaptation to the new interface.
All your knowledge and practice in the previous interface will continue being useful as before and they still go to facilitate your adaptation to Word new interface. Do not throw away your experience, but do not stagnate in it, by the contrary, use it to advance. It contemplates all menu commands and toolbar buttons in all of their different possible positions to be taught and/or acted, about 1296 in 42 bars that are shown by option or by context like in the original. The structure pops up selectively with the mouse running and goes away in an automatic fashion without polluting the new interface with bars, which is the main target of the Ribbon. The menu and toolbars structure is shown in a faithful and totally contextual way, making it possible to easily find the desired button. When clicking on the button, a new menu will be shown with the same button followed by step by step instructions on how to locate it in the Ribbon. The button is a faithful copy of the built-in one, which allows it to optionally or contextually be disabled or until enabled with productive effects. It consists of only one file, the WordTeachRibbon.dll, which is about 740 kb in size and can be installed automatically. Except for the DLL, no another setting is saved in the Windows Register. Its setting is saved in WordTeachRibbon.ini, WordTeachRibbonHotKey.dot, and WordTeachRibbonRegister.dat files that are created and maintained by the proper utility. You can uninstall it totally and automatically, leaving no mess on your Windows Register or disc. The first necessary and unique lesson to begin using this utility and to begin reading and understanding its main features is see new interface explanation here for Word 2007 or here for Word 2010 in Microsoft site. See two examples in the pictures below the Features item. Following items in this page: Register by Purchase or Free Pass Frequently Asked Questions (FAQs) Features:- The popup menu bar is shown vertically with all of the menus popping up with mouse over, which is just like the original. - The toolbars are shown vertically, as well, but are more informative than the original toolbars, because, beyond the icons, they also show button captions. - As in the earlier UI, a toolbar can be available (visible) in accord with the context, but you can show/hide any toolbar. - The available (visible) bars are listed alphabetically soon after Standard and Formatting toolbars that, if available (visible), will always appear on the top, by default. - It contemplates all 2003 toolbars, about 41 in all. - It can contemplate all menu commands and toolbar buttons in all of their different possible positions, about 1296. - It can be used in three modes: ‘Only Teach’, ‘Teach and Act’, and ‘Only Act’. The second seems to be the most ideal and definitive mode, but, in the first few days of use, the three can be ideal in different conditions. The first, when the user desires to speed up the learning; the second, when the user is lightly tired or hurried; and the third, when the user is very hurried to finish a job. These options are what makes it possible for users with experience in the previous interface to become immediate and productive users of Word 2007, 2010, or 2013. - The ‘Only Act’ mode can be perfectly understood as an alternative interface for Word where all the application area, except title and status bars, is available to the document. An interface maybe more friendly than original ones of 2003 and 2007, 2010, or 2013, because all buttons and commands, inclusive in Full Screen, are available and in the way of the mouse to be acted always with only two clicks in an optimized configuration. - The 2003 menus, commands, and buttons captions, as well as the Ribbon tabs, groups and buttons captions, are exactly equal to what appears in the local interface thanks to the RibbonX object. Therefore, except for some notes, normally about the button absence in the Ribbon, the Active Teach Ribbon aims to be functional in any Office local language. - It can repeat the instructions of the last taught button. - A long instruction with many steps or presenting more than one possible position in the Ribbon, can, to save memory effort, reappear automatically while you follow the steps browsing between Ribbon tabs. For this, it’s sufficient to click on an instruction line and it will reappear in 1.5 seconds, which is sufficient time to activate a tab. But, if you desire more time, keep pressing the Shift key or the Ctrl key. - It can be started from the “Teach Ribbon” button created in the Ribbon Add-Ins Tab and optionally from almost all the context menus and from a keyboard shortcut key set by the proper user. Context Menus are activated by the mouse right button or by the ‘Context Menu’ key that is in the right side of the modern keyboards, next to the Ctrl key. - It has a well optimized actuation dynamics where invariably any button is only at three clicks, but the proper user can still reduce it to only two clicks, adding the Teach Ribbon button at the Add-Ins Tab to the Quick Access Toolbar or attributing a keyboard shortcut key to a special IntelliMouse button. - The same limited version, available here to download, can be registered after it is installed. When inserting a Serial and a Registration Key, the limitations will be removed without the need of a reinstallation. You can get now a Serial by purchase or for free (Free Pass for 30 days trial), see the Register item below. - Still, without registering, the installation continues with all features functional, but limited to teach until 310 positions, the first five positions in each menu or toolbar. - Optionally, it can also show all classic menus and toolbars, about 41 in total, in Ribbon tab Add-ins in a fixed way, not in the form of a popup. As in the earlier UI, a toolbar can be visible by option or in accord with the context, but you can show/hide any toolbar. - Optionally, if the previous option is selected, all other fixed Ribbon tabs can be hidden. Note: this is not recommended! Hiding Ribbon tabs makes it impossible to teach positions in the new interface and the Active Teach Ribbon popup menu will only be used in ‘Only Act’ mode and to show and hide the classic interface toolbars. When keeping the tabs visible, you can use the best of both interfaces while, when there is available time, this helps you to learn to adapt to the new interface that, according to Microsoft, is an irreversible success in the current and future versions. - Optionally, if the two previous options are selected, the contextual Ribbon tabs can be hidden (disabled), too. Note: this is not recommended! Classic interface users may even question the improvement of the ribbon tabs in the new interface, but the contextual tabs are a real improvement for classic contextual toolbars. They are much more complete and nearly all new and important 2007, 2010, or 2013 version features are contained in them. Keeping them visible helps you to use the best of both interfaces. - When acting the Teach Ribbon button with Shift key pressed, the ‘Only Act’ mode is temporarily enabled without changing current setting, making possible yet to show classic menu commands of pressed Shift: Close All and Save All not found on the Ribbon. Download:Tested in Word for Windows, versions 2007, 2010 (32-bit), 2013 (32-bit), 2016 (32-bit), and 2019 (32-bit) in MSI-based and Click-To-Run installations of Office 365™ cloud-based services.
See also for Microsoft Access®, for Microsoft Excel®, and for Microsoft PowerPoint®. Pictures:
Register by Purchase or Free Pass:You can register your currently operating utility installation by a simple Serial number purchased or obtained from a Free Pass for a 30 day trial. 1 - Why and How: When registering your installation by the Serial number, the 310 positions limit, the first five positions in each menu or toolbar, is removed to teach the new positions in the Ribbon of all the 1296 possible positions in the Word 2003 menus and toolbars. The commands and buttons limitation of on the ‘Only Act’ mode and on classic menu and toolbars is removed too. The installation of the proper version available above for download and evaluation can be easily registered. Once installed and running, use the Register command, the last command on the start menu, to insert your Serial number, and follow the instructions to get the Registration Key that will be available for copying on an Internet homepage. To register, you must acquire one of the available serial number types: Nominal Serial or Bearer Serial. The Nominal Serial number is for Volume Licenses for companies and costs US$20.00 for a license for 25 computers and US$0.50 for each additional computer. You must provide user information in order to allow a minimum identification. To acquire a Nominal Serial number, send an email to orlando@cpap.com.br with the minimum following information: company name, the city and country in which the company is located, and the number of computers that you want to license. The Bearer Serial number is simpler and cheaper to purchase. It can be purchased now with a simple money transfer through Paypal international server. Additionally, you can purchase it anonymously. This process is very secure, privative, simple, and anonymous if you so choose. Without sharing financial info or filing an official registration, you can become the owner of a Serial number that gives utility use rights to its bearer in a personal and permanent way; thus, you can sell it hereafter if you choose. The Bearer Serial below of eigth case sensitive characters is now available to you for only US$8.00.
You can already use the offered Serial with the Registration Key below with a free pass. The free pass enables you to test a registered and fully functional instalation freely for 30 days: Serial: IUTMq21A (Eight case sensitive characters) Key: F138 (Four case sensitive characters) Notes: - To enter the Serial and the Key above, after downloading and installing the Teach Ribbon, open the Word, activate the 'Teach Ribbon' button on the Add-ins Tab of the Ribbon, and use the Register command, which is the last command on the start menu. - The Serial will remain valid, but a new Key will be required after 30 days. - If you, exceptionally, need to use it past 30 days, a new key can be obtained quickly in this dynamic link that is shown in the proper utility registration dialog box. The link is a homepage where you can obtain the Key copying or noting, because unfortunately, for security issues, this utility does not make connection with the Internet to obtain key. - However, this is still easier and more convenient for you than trying to retrocede your computer calendar, but the best option is purchasing your Serial and getting your computer definitive Key. - Your computer does not need to be connected to the Internet for you to be able to get a Key that has only four characters. You can type the dynamic link short address shown by the utility in the Microsoft® Internet Explorer® address bar of the other computer. - You also can return to this page to get a new Serial and a new Key. - Despite all these facilities, the intentional productive use of this utility out of the acceptable grace period for tests, normally 30 days, it is an illegal attitude.
3 - Technical
Notes About Serial and Buying the Serial gives you the definitive Registration Key, avoiding the necessity to get a new Key every 30 days. When inserting the Serial of eight characters, the utility already installed makes a checksum of it, generating a new four characters that, together with the proper serial, are going to compound the dynamic link. The dynamic link is showed in the utility dialog box exactly as it is, and the proper user, by clicking on it or copying it, inserts it into the address bar of Internet Explorer. This immediately returns a homepage with the suitable Registration Key to be copied or noted and inserted in the utility dialog box still by the proper user, because unfortunately, for security issues, this utility does not make a connection with the Internet to obtain a Key. The Internet Explorer, or any Internet browser, does not need to be the one on your computer. It can be the browser of any other computer. The checksum annexed to the Serial certainly does not carry any specific information from your computer due to three very simple reasons.. First, because it is a simple checksum of a string based in the proper Serial, try to change a character of the Serial and you will see that the Checksum changes, too. Secondly, because it is impossible put any valid information in, it only allows four characters. And thirdly, because it is always the same in your computer, therefore neither info part can be carried to an eventual composition. The only purpose of the Registration Key is to avoid the Bearer Serial distribution on the Internet in an indiscriminate way. If you are a normal user and take care of your Serial, with certainty, you are not going to perceive any inconvenience, because: - You can uninstall and install Windows and Office in your computer as many times as you want and as is necessary. - You can format and change your computer HD. - You can even use your computer HD in another computer and you won’t be required to get a new key. - Your Serial can only go to required different Keys if it is used in other computers, but it is perfectly tolerable that you have one or two Desktops in the home and at work, and more one notebook and substitute them all by new ones in each six month period that your Serial returns automatically to the new state.
Frequently Asked Questions (FAQs):1 - I like new Ribbon interface and would like to learn it as quickly as possible. Which would be my best setting? On the Active Teach Ribbon “Options” menu, simply mark the "Teach Only" option. Tip! For faster access with fewer mouse clicks, right-click on the Active Teach Ribbon button on the Ribbon Add-Ins tab and add it to the Quick Access Toolbar (QAT). 2 - I like new Ribbon interface and, despite my little available time, would like to learn as soon as possible while I work. Which would be my best setting? On the Active Teach Ribbon “Options” menu, simply mark the "Teach and Act" option. Tip! For faster access with fewer mouse clicks, right-click on the Active Teach Ribbon button on the Ribbon Add-Ins tab and add it to the Quick Access Toolbar (QAT). 3 - I dislike new Ribbon interface and prefer to continue using the classic menu and toolbars. However, I know that it is irreversible and eventually I would like to try to learn. Which would be my best setting? On the Active Teach Ribbon “Options” menu, mark two options: the "Teach and Act" option and the "Show Classic Menu on Ribbon Add-Ins Tab” option. 4 - I dislike new Ribbon interface. I don’t want to learn it because I think it doesn’t have a future and I prefer to continue using the classic menu and toolbars, but without losing the true improvements of the 2007, 2010, or 2013 version present on contextual tabs. Which would be my best setting? On the Active Teach Ribbon “Options” menu, mark two options: the "Show Classic Menu on Ribbon Add-Ins Tab" option and the "Hide All Others Ribbon Tabs (Not Teach)" option. 5 - I dislike new Ribbon interface. I don’t want to use anything from it, not even the contextual tabs; I prefer to use a purely classic interface. Which would be my best setting? A priori, this doesn’t look reasonable, but you can have your reasons. On the Active Teach Ribbon “Options” menu, mark three options: the "Show Classic Menu on Ribbon Add-Ins Tab" option, the "Hide All Others Ribbon Tabs (Not Teach)" option, and the "Hide Ribbon Contextual Tabs Too" option. 6 - Is the Active Teach Ribbon a heavy program that can cause some performance loss in Word? The Active Teach Ribbon doesn’t cause noticeable performance loss even when starting Word in slow machines and its responses are usually almost instant because it is a simple COM add-in with a single DLL of only 740 kb fully programmed in VBA. It doesn’t require any external library even when using its automatic installer; its calls are restricted exclusively to an internal library in any Office and Windows basic installations. 7 – Does the Active Teach Ribbon save changes to the Windows Registry or in the Word configuration files, leaving dirt after being uninstalled? Except for the DLL register as a COM add-in, no other change is saved in the Windows Registry or in the Word configuration files. Its settings are saved in its own files created and maintained by itself. If you manually remove the DLL from the Windows Registry using the Word COM add-in manager and then delete WordTeachRibbon.dll, WordTeachRibbon.ini, and WordTeachRibbonHotKey.dot files from the disk, nothing will be left as dirt even after having registered with a Free Pass for a 30 days trial. But you don’t have to do this manually; the same file that you downloaded to install can also uninstall and clean everything automatically. Note: In Windows XP and Vista, only users with full administrative rights can install and uninstall COM add-ins; however if you try to install without rights, this won’t cause any major problems, it simply won’t install.
|
||||||||
|
|
||||||||